

Quick Start
Install
Section titled “Install”npm install @zatlas/card-captureCharge now (checkout)
Section titled “Charge now (checkout)”The SDK handles the full payment flow. Your page just mounts the card form and calls checkout().
<div id="card-element"></div>
<script type="module">import { ZatlasCardCapture } from '@zatlas/card-capture';
const zatlas = new ZatlasCardCapture({  publishableKey: 'pk_sandbox_your_key',  locale: 'es-MX',});
const card = zatlas.create('card', { mode: 'checkout' });card.mount('#card-element');
// Get a fresh access token from your serverconst { accessToken } = await fetch('/api/payment-token').then(r => r.json());
card.on('cta_clicked', async () => {  const { payment, error } = await zatlas.checkout({    accessToken,    amount: 12000,          // amount in currency units (e.g. 12000 = $12,000.00 MXN)    currency: 'mxn',    reservationId: 'RES-123',    installments: { required: true },  // show installment picker  });
  if (payment) {    window.location.href = `/success?id=${payment.id}`;  } else {    console.error('Payment failed:', error.code);    // Error is also shown to the guest inside the card form  }});</script>
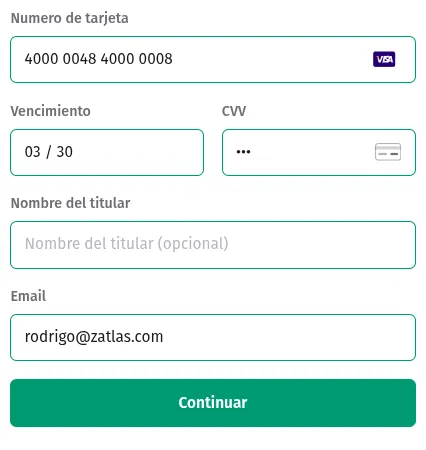
This is what the card form looks like once mounted — the guest fills in their details and clicks “Continuar”:
What happens:
- Guest fills the card form and clicks “Continuar”.
- The SDK fires the
cta_clickedevent. - Your code calls
checkout()with the payment details. - The SDK tokenizes the card, creates the payment, shows installment options (if requested), handles 3D Secure, and polls for the result.
- The promise resolves with
{ payment }on success or{ error }on failure.
Charge later (tokenization)
Section titled “Charge later (tokenization)”The SDK captures the card and returns a token. Your server charges later.
<div id="card-element"></div>
<script type="module">import { ZatlasCardCapture } from '@zatlas/card-capture';
const zatlas = new ZatlasCardCapture({  publishableKey: 'pk_sandbox_your_key',  locale: 'es-MX',});
const card = zatlas.create('card', { mode: 'tokenize' });card.mount('#card-element');
// Get a fresh access token from your serverconst { accessToken } = await fetch('/api/payment-token').then(r => r.json());
card.on('cta_clicked', async () => {  const { token, error } = await zatlas.createToken({    accessToken,    currency: 'mxn',  });
  if (token) {    // Send token.id to your server — it can charge later via the Payments API    await fetch('/api/save-method', {      method: 'POST',      body: JSON.stringify({ methodId: token.id, last4: token.card.last4 }),    });  }});</script>
What happens:
- Guest fills the card form and clicks “Guardar metodo”.
- The SDK fires the
cta_clickedevent. - Your code calls
createToken(). - The SDK tokenizes the card and returns a
mth_*token with card metadata (last4, brand, expiry). - Your server stores the token and creates payments via the Payments API when needed.
Test cards
Section titled “Test cards”Use these in sandbox:
| Card | Number | Result |
|---|---|---|
| Visa | 4242 4242 4242 4242 | Success |
| MSI | 4000 0048 4000 0008 | Installment picker (3, 6, 9, 12, 18, 24 months) |
| 3DS | 4000 0000 0000 3220 | 3D Secure challenge |
| Declined | 4000 0000 0000 0002 | card_declined |
| Insufficient | 4000 0000 0000 9995 | insufficient_funds |
Use any future expiry (e.g. 12/30) and any 3-digit CVC.
Next steps
Section titled “Next steps”- Backend Setup — Set up the OAuth2 token endpoint
- Checkout Integration — Full checkout guide with installments and 3DS
- Tokenization Integration — Save cards for scheduled payments